Building a rainwater collection system is a simple and sustainable way to conserve water while nurturing a thriving garden. By capturing rainwater, you can reduce your reliance on municipal water supplies, lower water bills, and help the environment. Whether you’re an experienced DIYer or a beginner, this guide will walk you through building an efficient and cost-effective rainwater collection system.
In this article, you’ll learn the benefits of rainwater harvesting, what materials you need, and how to set up a basic system step by step. Let’s get started!
1. Why Rainwater Collection Is Important for Your Garden
Rainwater collection offers significant benefits for both your garden and the environment:
- Conserves Water: Reduces dependence on municipal water systems, which is crucial during droughts or water restrictions.
- Saves Money: Using rainwater for your garden cuts down on water bills.
- Chemical-Free Water: Rainwater is naturally soft and free of chlorine or chemicals found in tap water, making it ideal for plants.
- Prevents Runoff: Collecting rainwater minimizes soil erosion and reduces runoff that can carry pollutants into local waterways.
- Eco-Friendly: It’s a sustainable practice that reduces your environmental footprint.
By harvesting rainwater, you’ll not only save resources but also ensure your garden thrives with clean, natural water.
2. Materials You’ll Need for a Basic Rainwater Collection System
Gather the following materials before starting your DIY project:
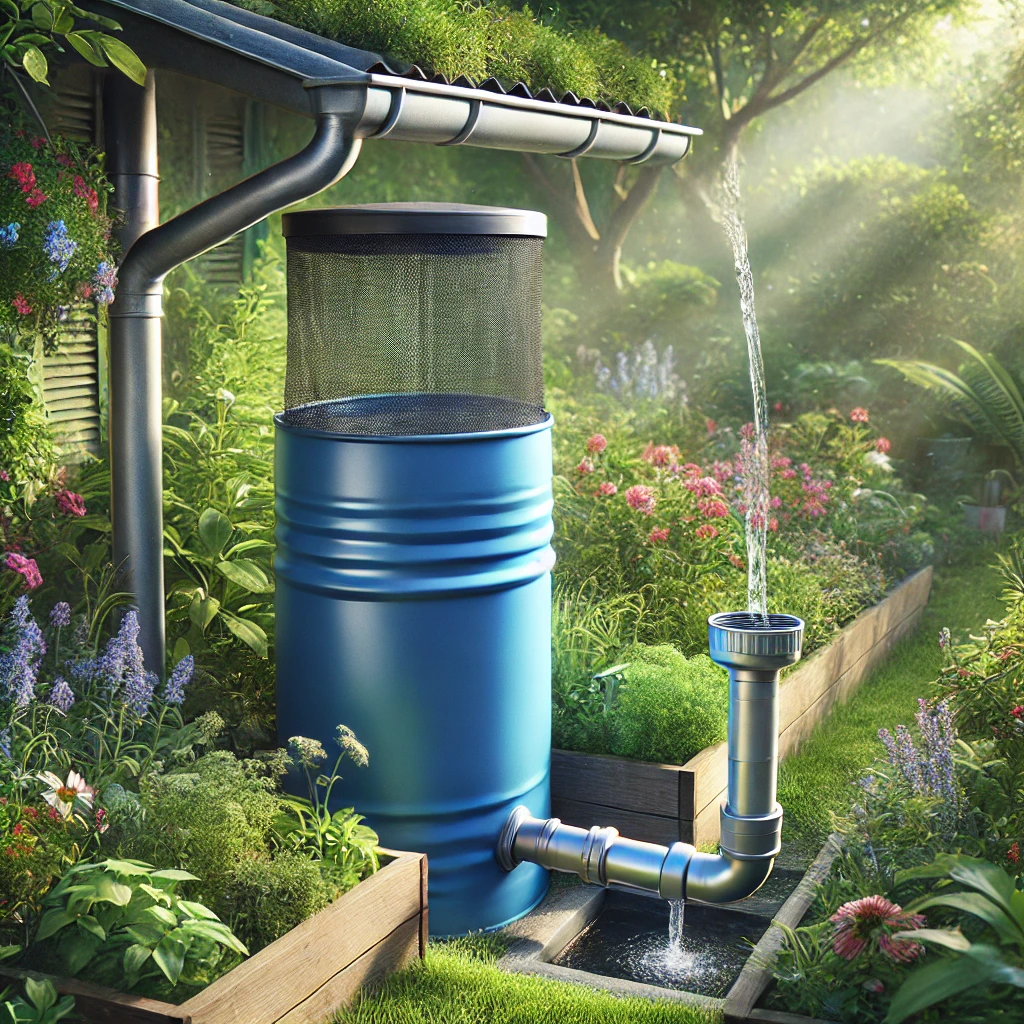
- Rain Barrel or Large Container: A food-grade plastic barrel (50–100 gallons) or any sturdy, watertight container.
- Downspout Diverter: Redirects water from your gutter into the rain barrel.
- Mesh Screen: Keeps debris, leaves, and insects out of the barrel.
- Spigot (Tap): Allows you to access the stored water easily.
- Overflow Pipe: Diverts excess water away from your foundation when the barrel is full.
- Cinder Blocks or a Stand: Elevates the barrel to improve water pressure and access to the spigot.
- Tools: A drill, hole saw, screws, rubber washers, and waterproof sealant.
Optional materials:
- Hose or Irrigation Line: Connects to the spigot for direct watering.
- Paint: Outdoor-safe paint to customize or protect your rain barrel.
3. Choosing the Best Location
The location of your rainwater collection system is crucial for efficiency:
- Near a Downspout: Position the barrel directly under a downspout where rainwater flows from your roof.
- Level Ground: Ensure the area is stable and level to prevent the barrel from tipping over.
- Accessible: Place it close to your garden for easy watering access.
- Sunlight and Shade: While full shade can reduce algae growth, partial sunlight ensures the system doesn’t freeze during colder months.
4. Step-by-Step Guide to Building Your Rainwater Collection System
Follow these easy steps to set up your DIY rainwater collection system:
Step 1: Prepare the Rain Barrel
- Choose Your Container: Use a large food-grade barrel or water-tight container. Avoid barrels that previously held chemicals.
- Drill a Spigot Hole:
- Mark a spot about 2–3 inches above the bottom of the barrel.
- Use a hole saw to drill a hole large enough for the spigot.
- Install the Spigot:
- Insert the spigot into the hole with rubber washers on both sides for a watertight seal.
- Tighten the connection and apply waterproof sealant around the edges to prevent leaks.
Step 2: Install the Overflow Pipe
- Drill the Overflow Hole: Near the top of the barrel, drill a hole large enough for the overflow pipe.
- Attach the Pipe: Insert the pipe into the hole. Use sealant if necessary to secure the connection.
- Direct Excess Water: Ensure the overflow pipe channels excess water away from the house foundation and into a garden bed, drain, or secondary barrel.
Step 3: Add the Mesh Screen
- Cut the Mesh Screen: Use a mesh screen to cover the barrel’s top. This will prevent debris, insects, and mosquitoes from entering.
- Secure the Screen: Attach the mesh tightly with a lid or zip ties to keep it in place.
Step 4: Connect the Downspout Diverter
- Cut the Downspout: Using a saw, cut the downspout at the height of the barrel’s lid.
- Attach the Diverter: Follow the manufacturer’s instructions to install the downspout diverter. It will direct water into the barrel while allowing overflow back into the gutter.
- Position the Barrel: Place the barrel on cinder blocks or a stand for stability and to elevate it for better water flow.
Step 5: Test the System
- Ensure all connections are secure.
- Pour water through the downspout to test the flow into the barrel.
- Check for leaks around the spigot, overflow pipe, and downspout diverter. Reseal any leaks as needed.
5. How to Use Collected Rainwater in Your Garden
Rainwater is a versatile resource that can be used in various ways to benefit your garden. Here are some practical applications:
a. Watering Plants
- Use a watering can or attach a garden hose to the spigot to water flower beds, vegetable gardens, and potted plants.
- Rainwater is ideal for delicate plants since it is free of chemicals like chlorine or fluoride found in tap water.
b. Refilling Garden Features
- Keep birdbaths, ponds, or fountains full using rainwater, which is healthier for wildlife than treated water.
- If your garden has a small water feature, use rainwater to maintain its water level.
c. Drip Irrigation Systems
- Connect your rain barrel to a drip irrigation system to provide a slow, steady supply of water to your plants.
- This method conserves water and ensures even hydration for your garden.
d. Cleaning Outdoor Areas
- Use collected rainwater for washing garden tools, patios, or outdoor furniture.
- This reduces your reliance on municipal water supplies for non-drinking purposes.
Important Note: Avoid using rainwater for drinking or cooking unless it is filtered and treated to meet safety standards.
6. Maintenance Tips for Your Rainwater Collection System
To ensure your rainwater collection system remains effective and durable, follow these maintenance practices:
a. Regular Cleaning
- Clean the Barrel: Empty and rinse the barrel every 2–3 months to prevent algae buildup and odor.
- Clear the Screen: Inspect the mesh screen after heavy rainfall and remove leaves, dirt, or debris.
b. Inspect for Leaks
- Check the spigot, overflow pipe, and connections regularly for leaks.
- Apply waterproof sealant to any areas showing signs of wear or leakage.
c. Winterize Your System
- In cold climates, drain the barrel before freezing temperatures arrive to prevent cracks or damage.
- Disconnect the downspout diverter and store the barrel indoors or cover it with an insulated wrap.
d. Prevent Mosquito Breeding
- Mosquitoes can lay eggs in standing water. Use these measures to prevent infestations:
- Keep the mesh screen tightly secured over the barrel.
- Add mosquito dunks or tablets (natural larvicides) to the water to eliminate larvae.
- Ensure water flows freely without stagnating.
e. Protect the Solar Panel (If Used)
- If your system includes a solar-powered pump, clean the panel regularly to maintain efficiency.
7. Expanding Your Rainwater Collection System
Once you’ve mastered a basic rainwater collection setup, you may want to expand your system to store more water or improve functionality:
a. Add More Barrels
- Link multiple rain barrels together using connecting kits. This increases your storage capacity and ensures no rainwater goes to waste.
b. Use a Larger Storage Tank
- Upgrade to a large storage tank (200–500 gallons) if your garden requires more water. These tanks can be connected to multiple downspouts for maximum collection.
c. Integrate Filtration Systems
- Add a simple filtration system to remove debris and sediment, making the water suitable for washing cars, windows, or other household uses.
d. Automate the System
- Install a pump and timer to automate watering for your garden, saving time and effort.
8. Why Rainwater Harvesting Matters
Rainwater collection systems have a far-reaching impact beyond just saving money:
- Reduces Strain on Municipal Water Supplies: Helps alleviate pressure on local water systems, especially during droughts.
- Minimizes Runoff Pollution: Prevents stormwater runoff from carrying pollutants into rivers, lakes, or oceans.
- Promotes Sustainability: Encourages eco-friendly practices that benefit future generations.
- Improves Plant Health: Provides natural, chemical-free water that plants thrive on.
By adopting rainwater harvesting, you’re contributing to a healthier planet while creating a lush, self-sufficient garden.
9. Conclusion: Start Collecting Rainwater Today
Building a rainwater collection system for your garden is a simple and rewarding DIY project that pays off in countless ways. From conserving water to nurturing your plants with chemical-free hydration, this system combines sustainability with practicality.
Key Takeaways:
- Benefits: Save water, reduce costs, and improve plant health with natural rainwater.
- Setup: With basic materials like a barrel, spigot, and diverter, you can create an effective rainwater collection system.
- Maintenance: Regular cleaning and seasonal preparation ensure your system works efficiently year-round.
Ready to get started? Gather your materials, follow the step-by-step guide, and make rainwater harvesting a part of your eco-friendly gardening routine!
Additional Resources
For more tips and guidance, check out these trusted resources:
- EPA: Rainwater Harvesting Overview
- Better Homes & Gardens: Rainwater Collection Ideas
- Rainwater Harvesting Association