Rainwater harvesting is one of the most practical and eco-friendly solutions for water conservation. Whether you’re a beginner gardener or someone looking to reduce water bills, a DIY rainwater harvesting system is an affordable way to make the most of natural rainfall.
This guide walks you through building a simple yet effective system that anyone can set up at home. By collecting and reusing rainwater, you can water your garden, clean outdoor spaces, and contribute to a more sustainable environment—all while saving money.
1. Why Rainwater Harvesting is Important
Before jumping into the DIY process, let’s look at why rainwater harvesting matters and the benefits it offers:
- Conserves Water: Reduces reliance on municipal water sources, especially in drought-prone regions.
- Cost Savings: Cuts down on utility bills by using free rainwater for irrigation, outdoor cleaning, and more.
- Eco-Friendly: Minimizes stormwater runoff, which can lead to soil erosion and water pollution in urban areas.
- Chemical-Free: Rainwater is free from chlorine and other chemicals, making it healthier for plants and lawns.
By harnessing the water that nature provides, you contribute to a sustainable solution that benefits both your home and the environment.
2. Types of DIY Rainwater Harvesting Systems
Understanding the different types of systems will help you decide which works best for your space and budget.
a. Rain Barrel System
- What It Is: A simple setup where a barrel collects rainwater from a downspout.
- Best For: Small gardens or households with limited space.
- Cost: Very affordable; often under $50 if you upcycle materials.
b. Dry System
- What It Is: A system where water flows directly from gutters into a large storage tank. It’s called “dry” because the pipes empty after each rain.
- Best For: Areas with occasional heavy rainfall.
- Benefit: Minimal maintenance and no underground pipes.
c. Wet System
- What It Is: A more advanced system where pipes are buried underground to connect multiple downspouts to a single storage tank.
- Best For: Large properties or homes with multiple gutter systems.
- Benefit: Keeps the setup discreet and visually appealing.
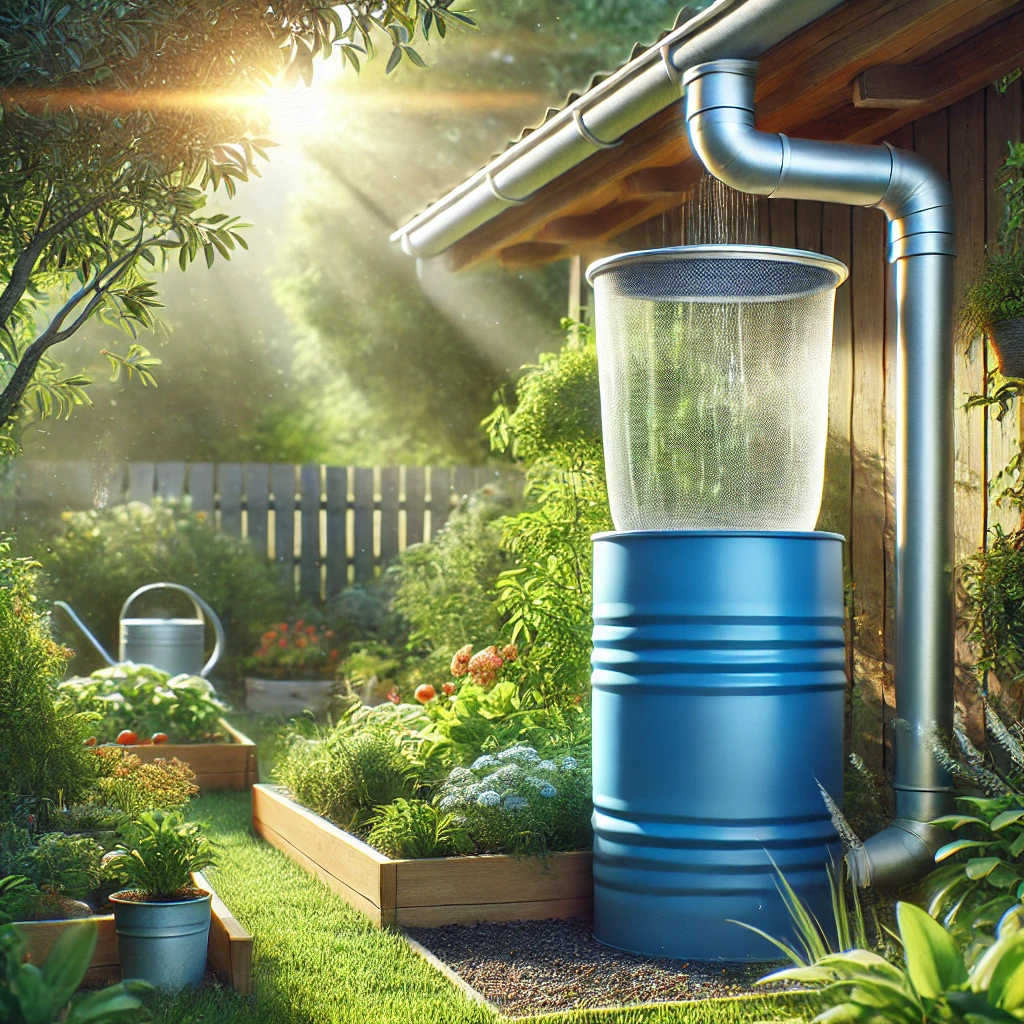
3. Materials Needed for a Simple Rain Barrel System
For beginners, a rain barrel system is the easiest and cheapest way to start rainwater harvesting. Here’s what you’ll need:
- Rain Barrel: A 50–100 gallon food-grade barrel or container.
- Gutter Downspout Diverter: Redirects water from your gutters into the barrel.
- Mesh Screen or Filter: Prevents leaves, insects, and debris from entering the barrel.
- Overflow Pipe: Allows excess water to drain safely away from your home’s foundation.
- Spigot: A tap to access the collected rainwater easily.
- Cinder Blocks or a Stand: Elevates the barrel for better water pressure and easier use.
- Basic Tools: Drill, sealant, screws, and hose connectors.
4. Step-by-Step Guide to Building Your DIY Rainwater Harvesting System
Follow these steps to build your rain barrel system:
Step 1: Choose the Right Location
- Place the barrel near a downspout where rainwater from the roof is directed.
- Ensure the area is level and stable to support the weight of a full barrel. Use cinder blocks or a sturdy stand to elevate it.
Step 2: Prepare the Rain Barrel
- Install the Spigot:
- Drill a hole about 2–3 inches from the bottom of the barrel.
- Insert the spigot, secure it with a washer, and seal it with waterproof sealant.
- Add the Overflow Pipe:
- Drill a hole near the top of the barrel for an overflow pipe.
- Attach a flexible hose to divert excess water to a garden bed or drainage area.
- Secure the Top:
- Place a mesh screen or filter on top of the barrel to keep out debris and mosquitoes.
Step 3: Connect the Downspout
- Cut a section of the gutter downspout and attach a diverter. Follow the instructions provided with the diverter kit to ensure a snug fit.
- Connect the diverter to your barrel using a hose or pipe.
Step 4: Test the System
- Pour water through the gutters or wait for rain to test the system.
- Check for leaks around the spigot, overflow, and downspout connections. Tighten or seal as needed.
5. How to Use Your Collected Rainwater
Now that your system is ready, here are some practical ways to use the harvested rainwater:
- Irrigate Your Garden: Use a watering can or attach a garden hose to the spigot for easy watering.
- Clean Outdoor Areas: Wash patios, decks, garden tools, or even cars using collected rainwater.
- Refill Water Features: Keep ponds, fountains, or birdbaths full without using treated tap water.
Important Note: Rainwater collected in barrels is not safe for drinking unless it’s properly filtered and treated.
6. Long-Term Maintenance Tips
A rainwater harvesting system is relatively low maintenance, but regular care ensures it works efficiently and lasts for years. Here are some essential maintenance tips:
a. Keep the Barrel Clean
- Every 2–3 months, empty the rain barrel completely. Rinse it with a garden hose to remove algae, sediment, or debris buildup.
- Scrub the interior with a mild soap and rinse thoroughly to prevent contamination.
b. Check for Clogs
- Inspect the mesh screen or filter regularly, especially after heavy rainfall. Clear away any leaves, dirt, or debris that may clog the inlet.
- Make sure the overflow pipe is clear to prevent water from pooling near the foundation.
c. Prevent Mosquito Breeding
- Mosquitoes can lay eggs in standing water, so always:
- Secure the mesh screen tightly over the top of the barrel.
- Add mosquito dunks—safe, natural bacterial tablets that prevent larvae from developing.
- Keep water moving if possible; a small solar-powered fountain can discourage mosquitoes.
d. Winterize Your System
- In regions with freezing temperatures, prepare your rain barrel for winter:
- Drain the barrel completely to prevent water from freezing and cracking the container.
- Disconnect the downspout diverter and seal the downspout to prevent leaks.
- Store the barrel in a garage or shed during the winter months if possible.
e. Inspect for Leaks
- Check the spigot, overflow pipe, and connections for leaks every few months.
- Reseal with waterproof sealant if needed to maintain the system’s efficiency.
7. Troubleshooting Common Issues
If you encounter problems with your rainwater harvesting system, here are solutions to common issues:
a. Leaks
- Problem: Water drips around the spigot or overflow connections.
- Solution:
- Tighten all fittings and connections.
- Use plumber’s tape or waterproof sealant around the spigot and pipe fittings to stop leaks.
b. Low Water Pressure
- Problem: Water doesn’t flow freely from the spigot.
- Solution:
- Elevate the rain barrel using a sturdy stand or cinder blocks to increase gravity-fed pressure.
- Ensure the spigot is not blocked by sediment or debris.
c. Overflow Issues
- Problem: Excess rainwater spills over the top of the barrel.
- Solution:
- Install a proper overflow pipe to divert excess water to a garden or drainage area.
- Ensure the downspout diverter does not channel too much water at once.
d. Algae Growth
- Problem: Green algae forms inside the barrel.
- Solution:
- Use an opaque or dark-colored barrel to block sunlight, which encourages algae growth.
- Add a small amount of food-grade hydrogen peroxide to the water to discourage algae.
8. Scaling Up: Expanding Your Rainwater Harvesting System
Once you’ve mastered a single rain barrel system, you may want to expand your rainwater collection capabilities. Here are some ways to scale up:
a. Connect Multiple Barrels
- Use a linking kit to connect two or more rain barrels. When one barrel fills up, water will flow into the next, increasing storage capacity.
b. Install a Larger Storage Tank
- Upgrade to a large storage tank (200–500 gallons) if you have higher water needs. Place it near a main downspout and use PVC pipes to channel rainwater efficiently.
c. Use the Water for Irrigation Systems
- Attach a drip irrigation system to your rain barrel for hands-free, water-efficient garden watering. Drip systems deliver water directly to plant roots, reducing waste.
d. Integrate Filtration Systems
- Add a basic filtration system to remove debris and contaminants, making rainwater suitable for washing vehicles, outdoor cleaning, or non-drinking household uses.
9. Benefits of Rainwater Harvesting Beyond Gardening
While most people use harvested rainwater for gardens, it has several additional uses:
- Washing Outdoor Spaces: Clean patios, walkways, and driveways without wasting potable water.
- Water for Pets and Livestock: With basic filtration, rainwater can be used safely for animals.
- Emergency Preparedness: In droughts or water outages, stored rainwater provides an alternative supply.
By maximizing rainwater use, you create a sustainable water solution that benefits your household and the environment.
10. Start Collecting Rainwater Today
Building a DIY rainwater harvesting system is one of the simplest and most rewarding projects for sustainability-minded homeowners. By starting with a basic rain barrel setup, you can:
- Conserve water and reduce your utility bills.
- Provide chemical-free water to keep your garden lush and thriving.
- Take meaningful steps toward environmental responsibility.
With proper maintenance and small upgrades, your system can grow to meet larger water demands, saving resources and money for years to come.
Ready to get started? Set up your rain barrel today and experience the benefits of harvesting free, natural rainwater!
Additional Resources
For more tips and guidance, explore these trusted resources:
- EPA: Rainwater Harvesting Overview
- Better Homes & Gardens: DIY Rainwater Collection
- Rainwater Harvesting Association